Most smartphones are capable of recording footage that would have required professional equipment ten years ago. They can record in 4K, handle low light, and produce results that, with some decent editing, can look quite impressive.
The difference between amateur and professional video is less about the camera than about a handful of decisions you make before recording.
This guide covers everything that make the biggest difference to your video. You don’t need to get them all right at once. The first two or three alone will make a significant impact.
1. Audio
This is the one most people tend to get wrong. Viewers will forgive poor video quality far more easily than poor audio. Muffled, echoey, or wind-whipped sound will make footage look amateurish, regardless of how good your video is. Clean audio makes even imperfect footage feel watchable.
The built-in microphone on a smartphone is designed mostly for calls. It picks up anything around you, such as background noise, air conditioning, traffic, and room echo. The easiest upgrade is a lavalier microphone that clips to your clothing. These are inexpensive, barely visible on camera, and significantly improve audio. And you can choose to hide it by clipping it inside a collar or under a layer of clothing.
For talking-head videos or interviews/podcasts, the location is just as important as the equipment. Recording in a smaller, furnished room produces less echo than a large empty space. While soft furnishings (e.g., rugs, carpets, curtains, couches, armchairs, blankets) absorb sound, hard surfaces (walls, tiles, glass, wood) do the opposite. So if you don’t have access to an external microphone, moving to a quieter, softer environment is the next best advice.
One thing to do before every recording: put on headphones and listen to what the microphone is picking up. This way, you can hear things you would not notice until the video comes back from editing.
2. Light
After audio, light is the factor most affecting the quality of professional video. Smartphone cameras perform well in good light and struggle in low or artificial light, producing grainy, flat images that are difficult to correct in post-production.
Filming outdoors
Outdoors is where you get the best natural light. The best time to film is usually the hour after sunrise and an hour before sunset: what photographers call the golden hour, producing warm, soft, directional light that flatters most subjects and requires no additional equipment. Midday is usually the worst time to record, when the sun is harsh, creates strong shadows under eyes and chin, and often overexposes the image. If you have no choice but to film at midday, film in the shade, where the light is still bright but diffused.
Clouds act as a giant natural diffuser, spreading light evenly across the scene and eliminating harsh shadows. Videos filmed in overcast light look better and are easier to colour correct than those filmed in direct sunlight.
Pay attention to the direction of light just as you would in an indoor setting. The light in front of you will result in a well-lit subject. The light at the back will result in a shadowy image of yourself. If you have to film in a particular location and cannot move to adjust the light, then the best option is to adjust the time of day.
Filming indoors
The best light source to use in an indoor environment is a window, since natural light is soft, even, and flattering. Face it rather than have it behind you. Otherwise, your face will be underexposed and the background blown out.
Before you start recording, look at your phone screen and ask yourself whether the image already looks good. If the image of the subject looks dark, then move closer to the light source or reposition. Avoid mixing light sources where possible, as they can produce uneven colour that is difficult to correct fully in editing.
For indoor settings without good natural light, a ring light or a small LED panel can make a huge difference. These are inexpensive, widely available, and produce even, consistent light that makes talking-head videos look immediately more professional.
3. Stability
Shaky footage instantly reads as amateur, while smooth, stable footage feels considered and intentional, even when everything else about the production is simple.
The best solution is a tripod or a small phone holder. For static shots, interviews, or any video where the camera is in one place, a tripod costs very little and solves the problem. A gimbal, which stabilises the camera electronically as you move it, is the next step up and significantly improves footage filmed while walking or moving around a space.
Without either, technique helps: hold the phone with both hands and tuck your elbows into your sides. Lean against a wall or a fixed surface and bend your knees slightly to absorb movement. Walk heel to toe rather than flat-footed. None of these replace a tripod, but they achieve noticeably steadier footage than holding the phone loosely in one hand.
That said, not all video needs to be perfectly stable. A handheld, slightly moving camera works well for some styles of content: a direct-to-camera video, a casual behind-the-scenes clip, a warm and informal talking piece. The movement in those cases feels intentional rather than accidental. The distinction is whether the instability serves the style of the video or undermines it.
4. Lock your focus and exposure
Smartphone cameras continuously adjust focus and exposure during recording, which produces the familiar effect of the image suddenly shifting or brightening mid-shot. It looks chaotic and it is one of the easiest things to fix.
On iPhone, press and hold on the subject in the viewfinder until a yellow box appears with an AE/AF Lock notification at the top of the screen. This locks the focus and exposure for the entire duration of the video.
On Android the process varies slightly by manufacturer. However, on most devices pressing and holding on the subject locks focus. Look for a lock icon or a sun symbol that appears after holding. Some Android camera apps have an explicit lock option in their settings.
5. Landscape vs portrait
The choice of whether to film in landscape or portrait depends on how you plan to use your video.
Portrait (vertical) is the standard format for Instagram Reels, TikTok, and YouTube Shorts. If you plan to share your videos exclusively on those platforms, filming portrait makes sense. Landscape (horizontal) is the standard format for YouTube, LinkedIn video, presentations, websites, and anything viewed on a screen larger than a phone.
If you need the same footage for both, film landscape. Cropping a landscape video to portrait in editing is much easier and produces a usable vertical result in most cases. The reverse is considerably harder: a portrait video cropped to landscape loses a significant portion of the frame and there is a good chance you will be chopping off parts of your subject. Landscape gives an editor more to work with regardless of the final destination.
6. Composition
Composition is how you arrange what is in the frame. There are a few basic rules that immediately improve your videos without requiring any technical knowledge.
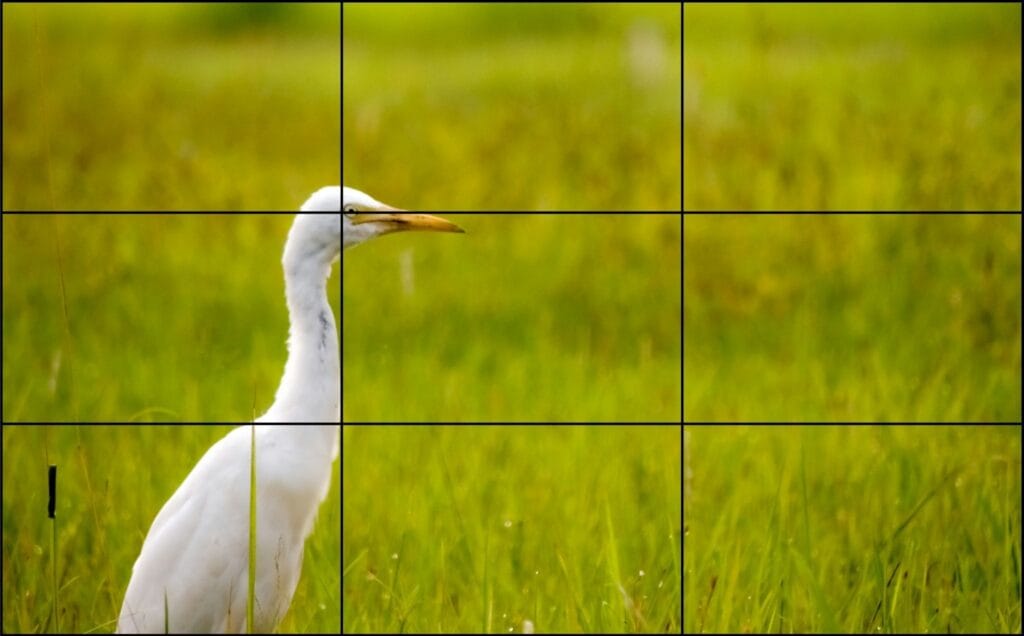
The rule of thirds. Most phone cameras have a grid option in their settings, which divides the screen into nine equal sections. Place your subject at one of the four intersection points rather than in the centre. This produces a much more engaging and naturally balanced image.
What is behind you matters. Non-professionals almost never check the background before filming. A cluttered desk, a busy wall, an open door onto a messy room: all of these take attention away from the subject. Before you start filming, take a look at what is behind you and simplify it. A tidy shelf or a window with a view work better than a distracting background.
Distance and framing. For a talking head video, it’s best to position the camera framing the person from their chest up, with a little space above their head. Too much space above reads as poorly composed. Too close feels uncomfortable. For product videos or anything showing an object or space, move the camera closer than feels natural. Phones have a tendency to make things look further away than they are.
Eye line. If you are speaking directly to the camera, place the phone at eye level or very slightly above. A phone propped on a desk and angled upward produces an unflattering shot that most people don’t notice until they play back the footage.
7. Camera settings
Resolution. Film in the highest resolution your phone supports, which for most modern smartphones is 4K. Higher resolution gives an editor significantly more flexibility, such as the ability to crop in, reframe, stabilise shaky footage, and correct without losing quality. The drawback is file size, so it’s important to have enough storage on your phone.
Frame rate. The most useful default is 30fps (frames per second), which produces clean, natural-looking video suitable for most purposes. 24fps has a slightly more cinematic quality but should only be used purposefully. 60fps is worth using if you plan to slow footage down in editing, as it gives the editor more frames to work with and produces smoother slow motion. For standard content, 30fps is the right choice.
Stabilisation. Most modern smartphones have some form of image stabilisation. Make sure it is turned on in your camera settings. On iPhone this appears as a stabilisation option within video settings. On Android it varies by manufacturer but is usually found within the camera or video settings menu.
Microphone input. If you are using an external microphone, check that your phone is picking up audio from it rather than the internal mic. Play back a short test recording to check before you start.
What editing can and cannot fix
A good editor can work wonders with imperfect footage. Colour correction can warm or cool an image, balance uneven light, and bring flat footage to life. Audio can be cleaned up, background noise reduced, and levels evened out. Shaky footage can be stabilised digitally, though with some loss of frame. Pacing, cuts, music, and subtitles all contribute to a final result that looks considerably more polished than the raw material.
What editing cannot do is recover footage that was fundamentally compromised at the point of recording. Audio recorded in a very echoey space with no external microphone will always sound like that regardless of what processing is applied. Footage shot in very low light produces grain and noise that correction can reduce but not eliminate. A shot that is severely out of focus cannot be sharpened into clarity. And portrait footage that needs to become landscape will always be a compromise.
The bottom line is, the areas covered in this guide are precisely those areas that will cause you the most difficulty in your editing. Getting them right will massively improve your outcomes.
If you want to outsource this part of the process, creative subscription services and video editing subscriptions are a practical way to do it.
ⓘ If you want to outsource this part of the process, check out our guides on how to find a video editor and on video editing subscriptions.
Frequently asked questions
Do I need to buy any equipment to film decent video?
Not necessarily. The most impactful changes, such as light placement, ensuring focus and exposure, holding the phone steady, and choosing the right format, are all free. If you’re going to spend money, the biggest impact for the least cost is a small lavalier mic. A tripod is the next best investment if you’re going to be filming in the same location regularly.
My footage always looks dark. What am I doing wrong?
Almost always a light issue. The camera is likely exposing correctly to the light in the room, but the subject of the video is in the shadows. Try moving closer to a window, turning to face the light source, or placing a light behind the camera to light the subject. If the image is still too dark, tap and hold on the image to lock the exposure, then adjust the exposure slider up if it’s available in your camera app.
Can I film vertically and use the footage for YouTube as well?
Technically yes, but the result will have black bars on either side and a very narrow image. It is workable for some purposes but generally looks unfinished. Film landscape if there is any chance the footage will be used on a platform that displays horizontal video.
What is the best phone for filming video?
For most purposes, any flagship smartphone from the past three or four years produces footage that is more than sufficient for social media, interviews, and regular content. The difference between an iPhone and an Android in terms of video quality is marginal compared to the difference that light, audio, and stability make.
How much storage do I need for 4K video?
4K footage at 30fps uses roughly 400MB per minute on most smartphones, though this varies by phone and codec. A ten-minute recording session at 4K will use approximately 4GB. If storage is a concern, film at 1080p, which produces a significantly smaller file while still giving an editor reasonable flexibility. Transfer footage to a computer or cloud storage regularly if you are filming often.
Does it matter if I film in slow motion?
While slow-motion footage can look great for certain videos, it is only recommended if you have specifically planned for it. Sending an editor a mix of slow motion and regular footage without noting which is which and why creates confusion. If you film in slow motion, note it in your brief and explain the intended effect.
If you are already filming regularly and would like a team to handle the editing, Kapibara Social offers subscription video editing for businesses and content creators.